Showing posts with label recipe. Show all posts

Sunday, October 16, 2011

Apple Coffee Cake

It's officially time to wind down with the cooking, well cooking sweets that is. I've just been suckered into trying so many recipes I've found on Pinterest . This is my rendition of a Food Network recipe from Emeril. I'm not super huge on fruit in my sweets, but OMG. I will make this over and over. It's incredibly easy and so delicious. Thank God we have a nice, big neighborhood and my neighbors get to participate in taste testing or I'd be 20lbs heavier..

Apple Coffee Cake With Crumble Topping

What you'll need for cake:
1 Stick plus 2 Teaspoons Unsalted Butter
1 1/2 Cups Light Brown Sugar, Packed
2 Large Eggs
2 Cups All Purpose Flour
1 Teaspoon Baking Soda
1 Teaspoon Ground Cinnamon
1/2 Teaspoon Salt
1 1/4 Cup Fat Free Sour Cream
2 Tablespoons Vanilla Extract
2 Cups Peeled, Cored, Chopped Apples { I used a combination of Gala and Macintosh and it was approximately 3 apples- I used a little more then 2 cups}.

What you'll need for the crumble...
1/2 Cup Light Brown Sugar, Packed
1/2 Cup All Purpose Flour
1/2 Teaspoon Ground Cinnamon
4 Tablespoons Unsalted Butter, Softened

Preheat oven to 350 degrees and lightly grease a 13 x 9 glass baking dish.

Cream together butter and sugar until light and fluffy. Add in eggs 1 at a time.


In a separate bowl, sift together flour, baking soda, cinnamon and salt.

Add to the wet ingredients, alternating sour cream and vanilla.


Peel, core and chop apples.


Fold in the chopped apples.


Pour into prepared baking dish, spread to edges evenly.

To make topping, combine sugar, flour, cinnamon, butter. Mix until combined into course crumbs. Sprinkle over the entire cake and bake until golden brown and set. Approximately 45 minutes.


Remove from oven and let cool on rack for approx. 10 minutes.


Enjoy because it's to-die-for.

xoxo


post signature

Saturday, October 8, 2011

Ah-Mazing Twice Baked Butternut Squash

It's obvious I'm in cooking and fall mode these days. I just love this season for the weather and food.

My husband can be quite picky when it comes to what he eats- mainly because he has a plethora of food allergies and is really restricted in his diet.

Since finding out he's allergic to potatoes, yes- POTATOES! We've been creative with side options when cooking dinner. I found this recipe via Pinterest {obsessed!} and made my own tweaks.

Twice Baked Butternut Squash

What you'll need:
1 Large Butternut Squash
1/2 Teaspoon Salt
1/2 Teaspoon Pepper
1/3 Cup Nonfat Sour Cream
2 Tablespoons Unsalted Butter
Fresh Chives- Chopped { about 3 tablespoons}
3 Tablespoons Italian Breadcrumbs

Preheat Oven to 450 Degrees

Halve squash, remove seeds and fibers. Sprinkle squash with salt and pepper.


Fill roasting pan with water, and place squash in pan. Roast for approximately 40 minutes. Let cool enough to handle.

Reduce temperature to 425 degrees.

Scoop out flesh into a large bowl leaving a 1/4 inch boarder around the edge of the squash.


To the bowl, add in sour cream, butter and chives. Mix together on low speed with hand mixer. Consistency will be similar to a whipped potato.


Pour mixture back into squash.


Add breadcrumbs to top and bake 20-30 minutes.


Enjoy!


post signature

Thursday, October 6, 2011

Feeling Fall- Banana Pumpkin Bread

We've been lucky enough to feel a bit of fall down here in Chs. It's been cool enough to wear jeans and a tee, which is a nice change from the high 90s. I love this weather, but must admit, I really miss the leaves changing in PA. So, to compensate for my lack of "fall leaves" I've decided to cook to "feel fall".

Banana Pumpkin Bread {low cal version}

What You'll Need:
2 Cups All Purpose Flour
3/4 Teaspoon Baking Soda
1/2 Teaspoon Salt
1 Cup Stevia {or Sugar for full cal. version}
1/4 Cup Butter, Softened
2 Large Eggs
3 Large Very Rip Bananas, Mashed
1/2 Can Pureed Pumpkin
2 Teaspoons Vanilla Extract
Cooking Spray

Preheat Oven to 400 Degrees

Combine flour, baking soda and salt with whisk.


Place sugar and butter in a large bowl, and beat with mixer on medium until blended. Add eggs one at a time, beating well after each addition.

Add in mashed banana and vanilla, beat until smooth.


Add in pumpkin puree, beat until smooth.


Begin to spoon in flour mixture, a little at a time.


Continue until flour mixture is completely blended.


Spray loaf pan with cooking spray. Add in bread mixture.


Bake at 400 for 1 hour. Check with a wooden pick or knife to be sure it's cooked through {it may come out a little bit dirty, but it's because of the pumpkin} . Please note, since there is pumpkin and banana in this recipe, it's going to be super moist!


Enjoy!

post signature

Sunday, October 2, 2011

Salted Caramel Pecan Cheesecake

I love to cook, especially desserts. I'm not going to take credit for every recipe I've ever used, because I take bits and pieces from other recipes and find a way to make it my own. Sometimes this can blow up in your face, but sometimes it works fabulously. I can honestly say, please read the entire recipe and feedback to make your own version of this amazing cheesecake. One thing I didn't think about was the caramel top getting rock hard once it's in the fridge...

What you'll need:

Crust:
1 1/4 Graham Cracker Crumbs {don't be lazy, smash them yourself!}
4 Tablespoons Unsalted Butter, Melted
3 Tablespoons Granulated Sugar

Filling:
32 Ounces Non Fat Cream Cheese
1 Cup Granulated Sugar
1 Large Egg Yolk
3 Eggs
3 Teaspoons Vanilla Extract

Topping:
1 Bag Kraft Caramels
1 Teaspoon Kosher Salt
1 Cup Whole Pecans

Preheat oven to 325. Butter the bottom of a 9 inch spring form pan.

Mix graham cracker crumbs, butter, and sugar in medium bowl until combined. Press in the bottom of pan and place in oven for 10 minutes.


And.. excuse the man hands, they are hubby's {I made him do the dirty work!}. Let cool.

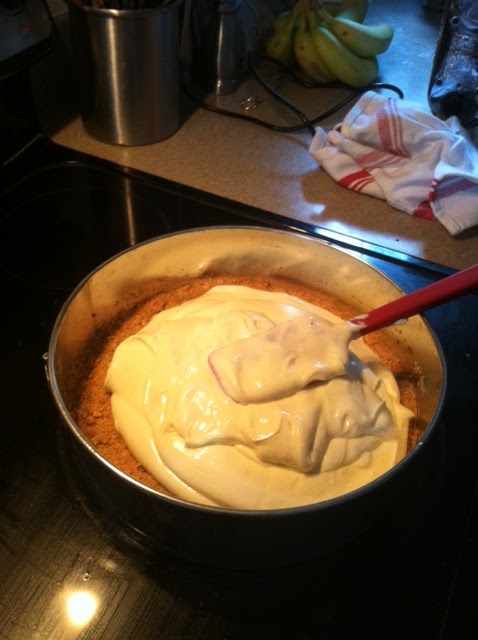
Next, mix cream cheese and sugar with an electric mixer at medium speed until smooth.


Add eggs, one at a time. Mixing completely after each. Add in vanilla extract and mix until combined.


Pour mixture into the prepared pan. Bake 40 minutes. Turn off oven, leave door slightly open and let cheesecake cool completely while in oven.


Once cooled, pull from oven.


Next, create a double broiler and begin to melt down caramels. Add in 2 tablespoons of water to make smooth.


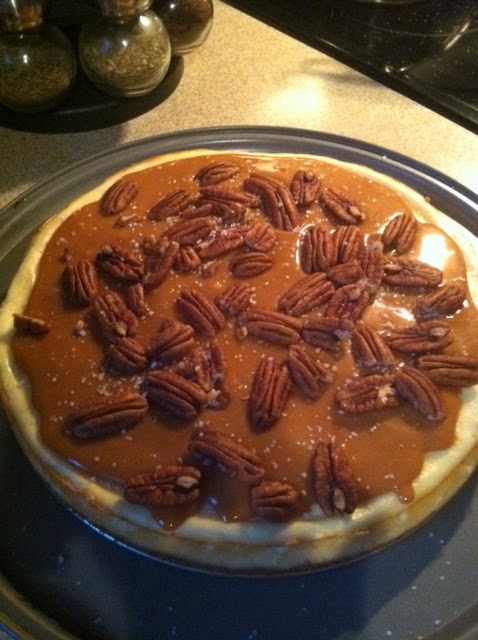
Once caramels are melted begin to pour over cheesecake.


After making this cheesecake, I'd recommend the following:
- Only drizzle over cheesecake.
- Or do topping for your guests while it's hot

If you do it as we did, the caramel will become too hard to cut since it's one big, thick layer.

Sprinkle on almonds and salt. Be VERY careful with salt, as it needs to be light.


Enjoy :)


xoxox

post signature

Monday, September 26, 2011

DIY Butterfingers

Since it's almost October, I'm getting into fall cooking mode. You would think that it would entail using pumpkin and squash.. but no with this chef, it's all about the sweets! You know, for the kids at Halloween, or for me :)

I found this idea on my newest guilty pleasure Pinterest and hubby and I decided to make it our own way..

What you'll need:
1lb Candy Corn
Chocolate Coating {they come in little containers that you pop in the microwave}
1 Small Jar Peanut Butter {we use the organic kind- with only peanuts as the ingredients}

First, melt down candy corn in microwave. Put in for 1 minute, then take out and stir. Keep popping it back in for 15 second increments until melted. Make sure it doesn't bubble!

Next, mix in peanut butter into hot melted candy corn mixture. You may need to pop this back in the microwave if it starts to harden.

Next, take a small square baking pan and line with wax paper.

Pour mixture into pan and place in the refrigerator to set. Wait until cool to remove. Make sure the bottom of the pan is cold too!

Next, cut into squares or strips {for a more Butterfingers like effect"


Next, melt dipping chocolate and dip squares into it and place on a sheet pan with wax paper.


Place back into refrigerator until set. This should take about 20 minutes.

Take out and enjoy! Look at how eerily similar they look to the real deal.


They taste like the real deal too!

Enjoy!


post signature

Thursday, September 1, 2011

OMG I'm Southern

Okay not really. But wow, taking over the Junior League of Charleston's blog makes me feel it.

Now you can follow my blog here and at www.cookinginthesouth.com/blog so book mark it now. It's going to be based on then fabulous things:


Entertaining 101 + Recipies from the Now

All Things Local Charleston

Recipes From Our Best Selling Books

And of course, any fabulous events happening with JLC.


And keep checking back here, because hilariously funny, juicy posts will be on this blog only. Like this:


xoxoxo

post signature

Wednesday, August 3, 2011

B. Gourmet

Although she has no clue I'm doing this, I wanted to do it in secret as she probably would cringe that it's not "complete" yet or hasn't been up and running long enough, but meet my best friend Brooke aka B. Gourmet .

We've been besties since HS, and she recently moved to Chs for culinary school and to me my operations manager at Newton Farms Catering . She's recently started blogging, and hasn't promoted much yet- but she already has killer content, especially her recipes! Now I'm going to embarrass her with some mushy bff pictures throughout the years {love you!}.


Now, do it! Follow B Gourmet . Cheers to many more years together! xoxo
post signature

Tuesday, June 28, 2011

Mai Tai Tuesday {Hawaiian Shirt Included}

The name is cute isn't it, but not cute the next day- PROMISE! It's taken me an entire week to actually write this blog, as I couldn't even bare to look at the pictures I took last week.

We try to get together with our neighbors at least once a week to have dinner and wine, while it's typically a low-key kind of night, last week turned into a week-night booze fest. I don't recommend this at all, except for on a weekend.

I guess that's what happens when you have air force boys next door that bring rock out to hard liquor during the week and don't think twice about what they have to do the next day.

What You'll Need:

A Hawaiian Shirt {some people choose to dress the part}


12 oz. Cocktail Glass Filled with Ice and the following items...


First,
1 oz. Light Rum
1 oz. Sweet & Sour Mix
1 1/4 oz. Pineapple Juice
1/4 oz. Orange Curacao
1/4 oz. Amaretto

Next,
1 Full Cap Grenadine
1 oz. Dark Rum

Pineapple & Cherry for Garnish {or soaking into the beverage}


Welcome to Mai Tai Tuesday, enjoy your hang-over!

post signature