Sunday, October 23, 2011

Channeling My Inner Martha

I've never been a crafty one, until I found my new love of Pinterest . Now, my boards are flooded with decor, food, and fashion ideas. Lucky for my followers, they too now have some great recipes to try.. and now some crafts for Halloween!

Since living in the south, I've discovered that pumpkin carving doesn't last. Maybe for a day or two and then they are covered in mold and funk. SO, this year, we've taken pumpkin decor to a whole new level.


We got two pumpkins, just in case if one of my bright ideas didn't work. But, they both did!

Here's our first.


All you need is black puffy paint. I got metallic black so it would sparkle just a little bit.

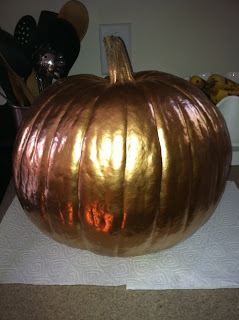
Next pumpkin, my bling pumpkin.


We spray painted with Brass Metallic spray paint. Honestly, it was pretty fabulous on it's own, but I wanted to personalize with a "F" and a little more bling.


Totally cute, not messy and super easy! We used black buttons and rhinestones. We used a hot glue gun, but I'm sure other glue would work, it would just take longer to dry.

Happy Fall!

xoxox

post signature

Sunday, October 16, 2011

Apple Coffee Cake

It's officially time to wind down with the cooking, well cooking sweets that is. I've just been suckered into trying so many recipes I've found on Pinterest . This is my rendition of a Food Network recipe from Emeril. I'm not super huge on fruit in my sweets, but OMG. I will make this over and over. It's incredibly easy and so delicious. Thank God we have a nice, big neighborhood and my neighbors get to participate in taste testing or I'd be 20lbs heavier..

Apple Coffee Cake With Crumble Topping

What you'll need for cake:
1 Stick plus 2 Teaspoons Unsalted Butter
1 1/2 Cups Light Brown Sugar, Packed
2 Large Eggs
2 Cups All Purpose Flour
1 Teaspoon Baking Soda
1 Teaspoon Ground Cinnamon
1/2 Teaspoon Salt
1 1/4 Cup Fat Free Sour Cream
2 Tablespoons Vanilla Extract
2 Cups Peeled, Cored, Chopped Apples { I used a combination of Gala and Macintosh and it was approximately 3 apples- I used a little more then 2 cups}.

What you'll need for the crumble...
1/2 Cup Light Brown Sugar, Packed
1/2 Cup All Purpose Flour
1/2 Teaspoon Ground Cinnamon
4 Tablespoons Unsalted Butter, Softened

Preheat oven to 350 degrees and lightly grease a 13 x 9 glass baking dish.

Cream together butter and sugar until light and fluffy. Add in eggs 1 at a time.


In a separate bowl, sift together flour, baking soda, cinnamon and salt.

Add to the wet ingredients, alternating sour cream and vanilla.


Peel, core and chop apples.


Fold in the chopped apples.


Pour into prepared baking dish, spread to edges evenly.

To make topping, combine sugar, flour, cinnamon, butter. Mix until combined into course crumbs. Sprinkle over the entire cake and bake until golden brown and set. Approximately 45 minutes.


Remove from oven and let cool on rack for approx. 10 minutes.


Enjoy because it's to-die-for.

xoxo


post signature

Saturday, October 8, 2011

Ah-Mazing Twice Baked Butternut Squash

It's obvious I'm in cooking and fall mode these days. I just love this season for the weather and food.

My husband can be quite picky when it comes to what he eats- mainly because he has a plethora of food allergies and is really restricted in his diet.

Since finding out he's allergic to potatoes, yes- POTATOES! We've been creative with side options when cooking dinner. I found this recipe via Pinterest {obsessed!} and made my own tweaks.

Twice Baked Butternut Squash

What you'll need:
1 Large Butternut Squash
1/2 Teaspoon Salt
1/2 Teaspoon Pepper
1/3 Cup Nonfat Sour Cream
2 Tablespoons Unsalted Butter
Fresh Chives- Chopped { about 3 tablespoons}
3 Tablespoons Italian Breadcrumbs

Preheat Oven to 450 Degrees

Halve squash, remove seeds and fibers. Sprinkle squash with salt and pepper.


Fill roasting pan with water, and place squash in pan. Roast for approximately 40 minutes. Let cool enough to handle.

Reduce temperature to 425 degrees.

Scoop out flesh into a large bowl leaving a 1/4 inch boarder around the edge of the squash.


To the bowl, add in sour cream, butter and chives. Mix together on low speed with hand mixer. Consistency will be similar to a whipped potato.


Pour mixture back into squash.


Add breadcrumbs to top and bake 20-30 minutes.


Enjoy!


post signature

Thursday, October 6, 2011

Feeling Fall- Banana Pumpkin Bread

We've been lucky enough to feel a bit of fall down here in Chs. It's been cool enough to wear jeans and a tee, which is a nice change from the high 90s. I love this weather, but must admit, I really miss the leaves changing in PA. So, to compensate for my lack of "fall leaves" I've decided to cook to "feel fall".

Banana Pumpkin Bread {low cal version}

What You'll Need:
2 Cups All Purpose Flour
3/4 Teaspoon Baking Soda
1/2 Teaspoon Salt
1 Cup Stevia {or Sugar for full cal. version}
1/4 Cup Butter, Softened
2 Large Eggs
3 Large Very Rip Bananas, Mashed
1/2 Can Pureed Pumpkin
2 Teaspoons Vanilla Extract
Cooking Spray

Preheat Oven to 400 Degrees

Combine flour, baking soda and salt with whisk.


Place sugar and butter in a large bowl, and beat with mixer on medium until blended. Add eggs one at a time, beating well after each addition.

Add in mashed banana and vanilla, beat until smooth.


Add in pumpkin puree, beat until smooth.


Begin to spoon in flour mixture, a little at a time.


Continue until flour mixture is completely blended.


Spray loaf pan with cooking spray. Add in bread mixture.


Bake at 400 for 1 hour. Check with a wooden pick or knife to be sure it's cooked through {it may come out a little bit dirty, but it's because of the pumpkin} . Please note, since there is pumpkin and banana in this recipe, it's going to be super moist!


Enjoy!

post signature

Tuesday, October 4, 2011

Restaurant Review: The Macintosh

For those of you that know me well, you know I'm a HUGE fan of Chef Jeremiah Bacon. Not only is the man easy on the eyes, but his dishes are to-die-for.

When I heard about his new spot The Macintosh or "The Mac" it was a must try on my list. Tonight I had hands down one of the best dining experiences EVER in Charleston. Might  I say, I think this has out-done my previous favorites McCrady's, Cypress and Eurasia.


The ambiance was awesome. I literally sat in my chair and rocked out to the soundtrack at this place. From DMB, Counting Crows and Amy Winehouse I was in love!


The staff rocked out some fabulous J Crew vests, with white button down shirts, ties and dark denim. Totally trendy, and totally fun. I'd rock that outfit on the street.


Did I also mention, for my viewing pleasure- we had the money spot. Right into the kitchen...


The Mac is owned by The Indigo Road Restaurant Group which also owns the newest cocktail lounge in Charleston The Cocktail Club which I've never been but have heard rave reviews.

I started with a Mac-Lite {yes, they have lower calorie versions of their cocktails!}

The Grande Carthusian, EG Vodka, green chartreuse,

Totally yummy, but not something I could drink more then one of.

Now on to the good stuff, the food!
Kurios Farms Bibb Lettuce,
Red Pepper, Agra Dolce, Fresh Crouton

Seared Scallops with cauliflower puree, pine nuts and arugula OMG!

7 oz C.A.B. Grilled Deckle,
Bordelaise
Hungry yet?!?!
Flounder with Parsnip Puree and Braised Greens

Last but not least.. the most DIVINE dessert ever. Props to the pastry chef.

Chocolate Caramel Torte with Sea Salt


I think this picture does it more justice..


Incredible staff. Fresh & Fabulous Food. Amazing Ambiance. Hot Chef. Really?! I think The Mac is top notch! Can't wait to go back again!

*Please note that  the menu constantly changes daily based upon fresh ingredients and creativity of the chef.

post signature

Sunday, October 2, 2011

Salted Caramel Pecan Cheesecake

I love to cook, especially desserts. I'm not going to take credit for every recipe I've ever used, because I take bits and pieces from other recipes and find a way to make it my own. Sometimes this can blow up in your face, but sometimes it works fabulously. I can honestly say, please read the entire recipe and feedback to make your own version of this amazing cheesecake. One thing I didn't think about was the caramel top getting rock hard once it's in the fridge...

What you'll need:

Crust:
1 1/4 Graham Cracker Crumbs {don't be lazy, smash them yourself!}
4 Tablespoons Unsalted Butter, Melted
3 Tablespoons Granulated Sugar

Filling:
32 Ounces Non Fat Cream Cheese
1 Cup Granulated Sugar
1 Large Egg Yolk
3 Eggs
3 Teaspoons Vanilla Extract

Topping:
1 Bag Kraft Caramels
1 Teaspoon Kosher Salt
1 Cup Whole Pecans

Preheat oven to 325. Butter the bottom of a 9 inch spring form pan.

Mix graham cracker crumbs, butter, and sugar in medium bowl until combined. Press in the bottom of pan and place in oven for 10 minutes.


And.. excuse the man hands, they are hubby's {I made him do the dirty work!}. Let cool.

Next, mix cream cheese and sugar with an electric mixer at medium speed until smooth.


Add eggs, one at a time. Mixing completely after each. Add in vanilla extract and mix until combined.


Pour mixture into the prepared pan. Bake 40 minutes. Turn off oven, leave door slightly open and let cheesecake cool completely while in oven.


Once cooled, pull from oven.


Next, create a double broiler and begin to melt down caramels. Add in 2 tablespoons of water to make smooth.


Once caramels are melted begin to pour over cheesecake.


After making this cheesecake, I'd recommend the following:
- Only drizzle over cheesecake.
- Or do topping for your guests while it's hot

If you do it as we did, the caramel will become too hard to cut since it's one big, thick layer.

Sprinkle on almonds and salt. Be VERY careful with salt, as it needs to be light.


Enjoy :)


xoxox

post signature

Monday, September 26, 2011

DIY Butterfingers

Since it's almost October, I'm getting into fall cooking mode. You would think that it would entail using pumpkin and squash.. but no with this chef, it's all about the sweets! You know, for the kids at Halloween, or for me :)

I found this idea on my newest guilty pleasure Pinterest and hubby and I decided to make it our own way..

What you'll need:
1lb Candy Corn
Chocolate Coating {they come in little containers that you pop in the microwave}
1 Small Jar Peanut Butter {we use the organic kind- with only peanuts as the ingredients}

First, melt down candy corn in microwave. Put in for 1 minute, then take out and stir. Keep popping it back in for 15 second increments until melted. Make sure it doesn't bubble!

Next, mix in peanut butter into hot melted candy corn mixture. You may need to pop this back in the microwave if it starts to harden.

Next, take a small square baking pan and line with wax paper.

Pour mixture into pan and place in the refrigerator to set. Wait until cool to remove. Make sure the bottom of the pan is cold too!

Next, cut into squares or strips {for a more Butterfingers like effect"


Next, melt dipping chocolate and dip squares into it and place on a sheet pan with wax paper.


Place back into refrigerator until set. This should take about 20 minutes.

Take out and enjoy! Look at how eerily similar they look to the real deal.


They taste like the real deal too!

Enjoy!


post signature